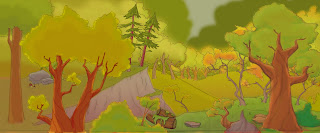
So the piece that Brittany was wondering about was actually a multiplane camera move from my student animated film. I wanted to somehow incorporate some animation into my show, because I had kind of been working on it for pretty much forever and I thought that maybe I should showcase it somehow. I took one of the few colored bits of my film, and because it is a multi layered animation background, I decided to make it into a multi layered piece of arty goodness. The first picture is the actual digital copy that I colored in photoshop. It in of itself is made up of probably at least a hundred different layers...

I printed each layer of the background out on multipurpose transparency film (which was freaking expensive by the way!). This is layer #2.

When I had printed out each layer I discovered that when they say transparency they really mean it, and you could see through each layer...

I decided to paint the back of each layer with white acrylic paint so that you wouldn't be able to see through the actual artwork. There were a lot of very tiny details, so this was definitely the part that took the longest amount of time.

I then broke out my super crafty powers and my secret weapon-fun foam. Using photo mounting squares I stuck a couple of squares together to add some thickness to them.

I then strategically placed them in between two of the layers so that they would be separated slightly.

I did it for each layer, and added extra squares at the top of the transparencies to help keep them straight.


When all of the layers were attached it looked a little something like this.

And the back looked a little something like this.

I placed a piece of white paper over the back to serve as the very bottom layer and the sky.

And then it looked like this!

I had a mat cut to cover the edges of the transparencies and to hide all of the foam squares.

I stuck it to the mat with more photo mounting squares and put a piece of black construction paper over the back to help block out any light that might come in from behind and show the foam squares. The frame that I had bought for it was actually a shadow box that had glass both in the front and the back, so if you were using a normal frame you probably wouldn't need the construction paper.


No comments:
Post a Comment